

I’m now blogging over here
Sorry, I got fed up with wordpress, and moved to Jekyll on GitHub: http://richorama.github.io/
Sorry, I got fed up with wordpress, and moved to Jekyll on GitHub: http://richorama.github.io/
Warning: This is a complete hack
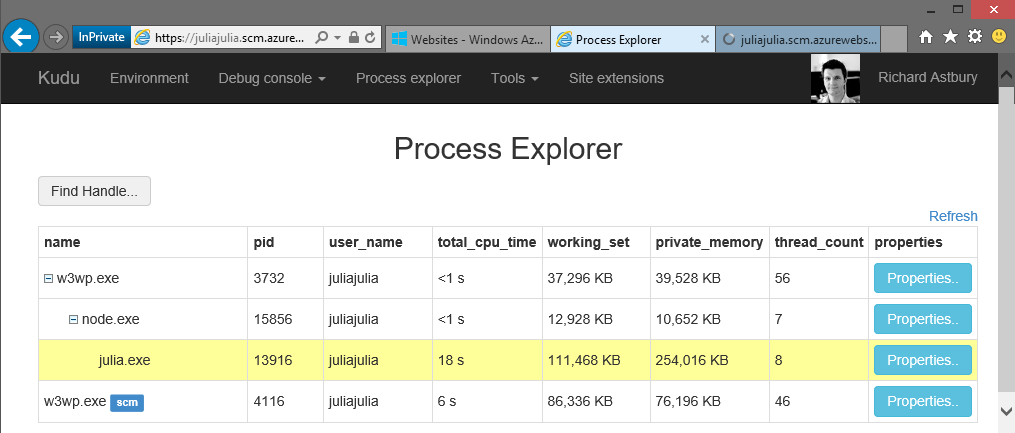
A node process hosts the julia server, and passes the name of the named pipe to it as an argument.
Azure websites hosts node.js apps with IISNode. This basically does two things, activate the node process, and forward HTTP requests to is using a named pipe.
Websites doesn’t restrict you to hosting JavaScript files, in fact you can start any old binary. I have had some success in hosting Go on Websites before (using node to forward requests using CGI).
Julia is a language that’s been around for a couple of years. It’s general purpose, with a strength in mathematical programming. I really like the syntax, and it seems to fit with the way I think about programming.
Julia has a web stack, with Morsel.jl as the ‘Sinatra like’ web framework. I’m playing around with some of my own ideas, built on the same stack. I’ve called it Jolt.jl.
Julia sits on the same networking library (libuv) as node, so I thought it would be simple to get it running on Azure. I was wrong.
Let’s go through the steps I took to get it working.
bin and lib folder from %HOME_DIRECTORY%\AppData\Local\Julia-0.3.2 into your repository.%HOME_DIRECTORY%\.julia directory..git folders from the packages, and remove all the .gitignore files.push!(LOAD_PATH, ".") (we’ll do this in a bit).HTTPServer module, so it uses PipeServer instead of TcpServer. This allows us to respond to requests on the named pipe. This will look something like this:
immutable HttpHandler
    handle::Function
    sock::Base.UVServer
    events::Dict

    HttpHandler(handle::Function) = new(handle, Base.PipeServer(), defaultevents)
end
run method, to bind your named pipe to the PipeServer:
export run_pipe

function run_pipe(server::Server, pipe::ASCIIString)
    id_pool = 0 # Increments for each connection
    sock = server.http.sock
    websockets_enabled = server.websock != nothing
    Base.uv_error("listen", !Base.bind(sock::Base.PipeServer, pipe))
    listen(sock)
    event("listen", server, 0)

    while true # handle requests, Base.wait_accept blocks until a connection is made
        client = Client(id_pool += 1, accept(sock))
        client.parser = ClientParser(message_handler(server, client, websockets_enabled))
        @async process_client(server, client, websockets_enabled)
    end
end
GnuTLS from HttpServer (remove the using statement and the run_https function). It’s more trouble than it’s worth!deps.jl files which point to binaries on your local machine, and set to "D:\home\site\wwwroot\* instead.
push!(LOAD_PATH, ".")

using HttpServer
using Jolt
using JoltView
using JoltJson

app = jolt()

app.get("/") do req, res, ctx
    "hello world"
end

http = HttpHandler(app.dispatch)
server = Server(http)
run_pipe(server, ASCIIString(ARGS[1].data))
server.js) to start the Julia App.
var spawn = require('child_process').spawn;
console.log("starting julia");

var env = process.env;
env["HOMEDRIVE"] = "C:";
env["HOMEPATH"] = "\home\site\wwwroot";

var julia = spawn('bin\julia.exe',
    ["server.jl", process.env.port],
    {
        env : env,
        cwd : process.cwd()
    },
    function callback(error, stdout, stderr){

});

julia.stdout.on('data', function (data) {
  console.log(data);
});

julia.stderr.on('data', function (data) {
  console.log(data);
});

julia.on('close', function (code) {
  console.log('Julia exited with code ' + code);
});
Alternatively, you can just clone my repo which seems to work.
If you’ve got a node.js website running in Azure Websites, you get SSL by default, or if you bring your own domain name, you can easily set up SSL with your own certificate.
The default behaviour is that the website serves both HTTP and HTTPS requests, but what if you want to switch users automatically over to HTTPS (i.e. disable HTTP).
The normal approach when using express.js is to use some middleware which detects the protocol and redirects accordingly. Like this:
// this doesn't work in Azure Websites
function requireHTTPS(req, res, next) {
    if (!req.secure) {
        return res.redirect('https://' + req.get('host') + req.url);
    }
    next();
}

app.use(requireHTTPS);
req.secure is just a shorthand for checking the protocol of the incoming request. However, in Azure websites your server is fronted by a web server running ARR, which does the SSL termination. This means the request you see will always be HTTP. The above code samples creates a redirect loop as the middleware continues to redirect to HTTPS, as it keeps seeing HTTP.
Fortunately ARR adds some additional headers to the request. These are:
cookie: ARRAffinity=71111a2979a8796b0cc6860d7f98cb7519aaea861cc96f15896edbb25a259064
host: XYZ.azurewebsites.net
max-forwards: 10
x-liveupgrade: 1
x-arr-log-id: 7cffa211-21f6-42c2-8b7d-e9eacac8adc8
disguised-host: XYZ.azurewebsites.net
x-site-deployment-id: XYZ
x-original-url: /url
x-forwarded-for: 212.69.41.154:4219
x-arr-ssl: 2048|128|DC=com, DC=microsoft, DC=corp, DC=redmond, CN=MSIT Machine Auth CA 2|C=US, S=WA, L=Redmond, O=Microsoft, OU=OrganizationName, CN=*.azurewebsites.net
The x-arr-ssl header is only added for HTTPS requests, so we can use this header to determine whether it’s a HTTP or HTTPS request.
function requireHTTPS(req, res, next) {
    if (!req.get('x-arr-ssl')) {
        return res.redirect('https://' + req.get('host') + req.url);
    }
    next();
}

app.use(requireHTTPS);
You could go one better, and only do the upgrade if you’re running in Azure, which means you can run your site in plain HTTP in your local environment:
function requireHTTPS(req, res, next) {
    if (req.get('x-site-deployment-id') && !req.get('x-arr-ssl')) {
        return res.redirect('https://' + req.get('host') + req.url);
    }
    next();
}

app.use(requireHTTPS);
Azure has it’s own method of handling HTTPS redirection. NodeJS apps in Azure are still manage through IIS runtimes.
Their recommended approach is to add rewrite rules to the web.config.
The web.config is only created after an initial deployment (easiest way to get it generated for all the node handling). You grab it via FTP credentials set up through the portal and simply add the rewrite rule to the existing rules in place.
Once its there and you include it in the root dir of your deployed app, azure will use it.
Here’s the simple rewrite rule: https://gist.github.com/tstpierre/afec7eb409aebe0bf3d1

The new Azure Search service is a nice ‘search as a service’ offering from Microsoft. Just add your documents, and then run some queries. It’s exposed as a REST API which talks JSON :¬D
It has a free tier, limited to 3 indexes and 10,000 documents, but you can of course start paying the money and index more stuff.
I just wrote a JavaScript client (I couldn’t find a Microsoft one) to connect to the API, let’s explore how we can use it.
Note this article assumes you are familiar with writing JavaScript for node.js and the browser.
First, open up the new Azure Portal and go to NEW -> Search and enter some details in.
You’ll need to switch to the free tier, otherwise you’ll start clocking up a bill.
We’ll start off using Node.js, as only a few of the features (quite correctly) can be used from the browser.
Once it’s created go to the properties and keys sections of the search service blade, and make a note of your url and an admin key.
First install the package:
$ npm install azure-search
Now let’s write write some JavaScript in node to create an index.
var AzureSearch = require('azure-search');
var client = AzureSearch({
    url: "https://MY_SEARCH_SERVICE_NAME.search.windows.net",
    key:"MY_SEARCH_SERVICE_KEY"
});
Now we have a client, we can create an index in the Search Service. To do this, we need to create a schema, which will tell the service what kind of data we want to store and search. There’s more information about how to create the schema in the Microsoft documentation, but for a simple example, I’ll have some text, and a key that I’ll use to refer to the text.
var schema = {
  name: 'myindex',
  fields:
   [ { name: 'id',
       type: 'Edm.String',
       searchable: false,
       filterable: true,
       retrievable: true,
       sortable: true,
       facetable: true,
       suggestions: false,
       key: true },
     { name: 'description',
       type: 'Edm.String',
       searchable: true,
       filterable: false,
       retrievable: true,
       sortable: false,
       facetable: false,
       suggestions: true,
       key: false } ],
  scoringProfiles: [],
  defaultScoringProfile: null,
  corsOptions:  { allowedOrigins: ["*"]} };

client.createIndex(schema, function(err, schema){
  if (err) console.log(err);
  // schema created
});
Note that at the bottom of the file there’s a
corsOptionssetting which setsallowedOriginsto["*"]. We’ll be using this later to access the index from the browser.
Now we’re ready to start adding documents to the index. In the schema we specified id and description fields. So we just need to supply an object with these fields.
var document = {
  id: "document1",
  description: "this is a document with a description"
};
client.addDocuments('myindex', [document], function(err, confirmation){
  if (err) console.log(err);
  // document added
});
In fact we can send through a batch of document through at once, by adding more items to the array.
We can query the index from node, but the Search Service supports CORS, which allows us to query directly from the browser without having to stand up any of our own server-side infrastructure. This is where the CORS settings came in when we created the schema.
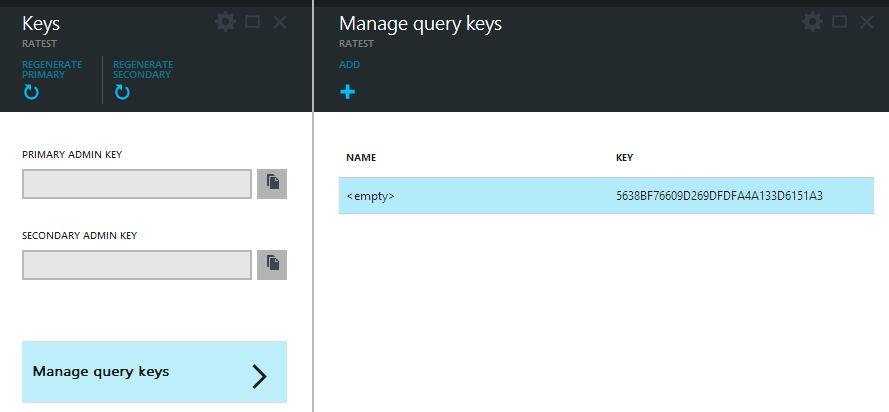
One thing to be careful of; don’t put your Search Service admin key in a public web page. Instead, go back to the portal and use a query key (see the manage keys button when you’re looking at the keys).
Now we can create a web page where we can call the index, and pass in some search queries. To do this we need to add a reference to azure-index.min.js (or use browserify, and just require ‘azure-index’).
<html>
    <head>
        <script src="azure-search.min.js"></script>
    </head>
    <body>
        <script>

        var client = AzureSearch({
          url: "https://MY_SEARCH_SERVICE_NAME.search.windows.net",
          key:"MY_QUERY_KEY"
        });

        client.search('myindex', {search:'document'}, function(err, results){
          // results is an array of matching documents
        });

        </script>
    </body>
</html>
Note that from the browser, only
search,suggest,lookupandcountwill work.
For more information, please consult the Microsoft documentation and the documentation for the module.
The search service looks quite powerful. We’ve only scratched the surface of the options here. I’m keen to combine the search service with a trace listener, so you can index your application’s logging.
It’s great to see Microsoft move away from the awkward API conventions used for the storage system, which included complicated header signing and XML. This JSON approach with a simple API key as a header is nice and simple.
It’s also great to see CORS support our of the box, which makes it easy to consume this service directly from the browser.
Personally I think API version number looks out of place on the URL, and would be better as a header, but maybe that’s just me.
I also would prefer not to have to specify my schema. I’d like to just throw JSON objects at the service, and then be able to query on any of the fields, but I guess that’s DocumentDB!
If you look at the standard OrleansConfiguration.xml configuration file you get with Orleans, it looks something like this:
<?xml version="1.0" encoding="utf-8"?>
<OrleansConfiguration xmlns="urn:orleans">
  <Globals>
    <StorageProviders>
      <Provider Type="Orleans.Storage.MemoryStorage" Name="MemoryStore" />
    </StorageProviders>
    <SeedNode Address="localhost" Port="11111" />
  </Globals>
  <Defaults>
    <Networking Address="localhost" Port="11111" />
    <ProxyingGateway Address="localhost" Port="30000" />
    <Tracing DefaultTraceLevel="Info" TraceToConsole="true" TraceToFile="{0}-{1}.log">
      <TraceLevelOverride LogPrefix="Application" TraceLevel="Info" />
    </Tracing>
    <Statistics MetricsTableWriteInterval="30s" PerfCounterWriteInterval="30s" LogWriteInterval="300s" WriteLogStatisticsToTable="true"/>
  </Defaults>
  <Override Node="Primary">
    <Networking Address="localhost" Port="11111" />
    <ProxyingGateway Address="localhost" Port="30000" />
  </Override>
</OrleansConfiguration>
This configuration starts a silo listening on port 30000 (ProxyingGateway), and other silos can talk to it on port 11111 (Networking). It also identifies a SeedNode, which is the primary silo in the cluster. The seed node address and port match those specified for this silo, which makes this the primary.
You’ll also notice the Override section at the bottom, which specifies the same ProxyingGateway and Networking ports again.
In this case, the Override section doesn’t do much, but suppose we want to start a secondary silo? We can specify the ports for a secondary node to use here, like this (in this case a silo on the same machine, so on different port numbers):
<?xml version="1.0" encoding="utf-8"?>
<OrleansConfiguration xmlns="urn:orleans">
  <Globals>
  ...
  </Globals>
  <Defaults>
  ...
  </Defaults>
  <Override Node="Primary">
    <Networking Address="localhost" Port="11111" />
    <ProxyingGateway Address="localhost" Port="30000" />
  </Override>
  <Override Node="Secondary">
    <Networking Address="localhost" Port="11112" />
    <ProxyingGateway Address="localhost" Port="30002" />
  </Override>
</OrleansConfiguration>
This allows us to use the same configuration file for both a primary and a secondary node, as the other settings will be the same (they must all specify the same primary (seed node)).
To make use of the override, when you start the silo, just specify the name as the first argument.
$ OrleansHost.exe Primary
$ OrleansHost.exe Secondary
You can also specify the configuration file you want to use, in case you have several (the default is OrleansConfiguration.xml).
$ OrleansHost.exe Primary MyConfiguration.xml
Interestingly, when starting a number of silos it only seems necessary to tell a client about one of silos (a primary or secondary) it seems to figure out the cluster members automatically.
I previously blogged about the public IP address ranges for Azure.
The public IP addresses ranges for Amazon has recently been updated. Amazon has over 8 million addresses, which is 8 times the number Azure has.
Interestingly, these are not so evenly distributed:
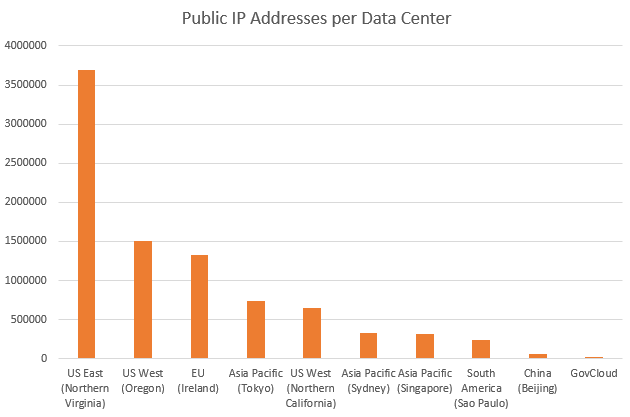
Raw data:
| DC | Total public IP addresses |
|---|---|
| US East (Northern Virginia) | 3694592 |
| US West (Oregon) | 1507328 |
| EU (Ireland) | 1332224 |
| Asia Pacific (Tokyo) | 739328 |
| US West (Northern California) | 655360 |
| Asia Pacific (Sydney) | 327680 |
| Asia Pacific (Singapore) | 313344 |
| South America (Sao Paulo) | 245760 |
| China (Beijing) | 65536 |
| GovCloud | 16384 |
| TOTAL | 8897536 |
I have also updated my tool to look up which DC a website is hosted in, to include the Amazon IP ranges.
One of the things I like about Nancy is the ease of creating self hosted HTTP services.
Here’s how to enable HTTPS for your service.
First of all, create your SSL certificate:
$ openssl req -x509 -newkey rsa:2048 -keyout key.pem -out cert.pem
$ openssl pkcs12 -export -in cert.pem -inkey key.pem -out mycert.pfx
Then go to ‘Manage Computer Certificates’ in the start menu (I’m using Windows 8.1).
Right click on ‘Personal’ and import the freshly created mycert.pfx.

Now go to your newly installed certificate, and get the thumbprint:
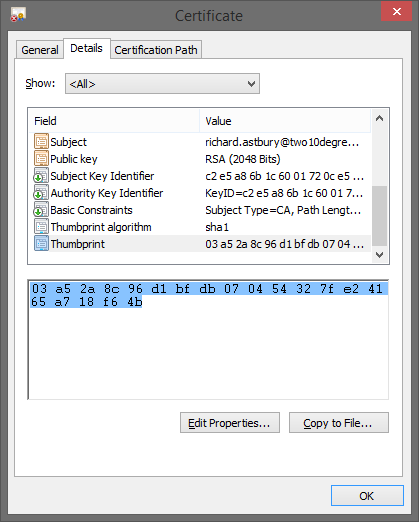
Now you need to register the URL with Windows:
$ netsh http add urlacl url=https://+:4443/ user=YOUR_USERNAME
$ netsh http add sslcert ipport=0.0.0.0:4443 certhash=YOUR_THUMBPRINT_WITHOUT_SPACES appid={06aabebd-3a91-4b80-8a15-adfd3c8a0b14}
You need to substitute your username, and the certificate thumbprint you copied (without the spaces)
The appid is just a random guid, feel free to create your own.
Now start nancy on this Uri https://localhost:4443/.
using (var host = new NancyHost(new Uri("https://localhost:4443/")))
{
    host.Start();
    Console.ReadKey();
}
How to check that HTTPS request working in Nancy Host or not?
send it an HTTPS request from your browser?
I send request from browser. but i got no response.
Sounds like it didn’t work.
Try putting some logging in your app, and looking at the HTTP traffic in fiddler.
Let me try once again..
I created new certificate and then i register them successfully. Then I use browser to send https request and apply break point. But it was not working.
Getting error NET::ERR_CERT_AUTHORITY_INVALID
Getting error HTTP Error 503. The service is unavailable on browser. Can you guide me how i can get response using HTTPS.
Hi Richard,
I am able to create certificate and able to register it successfully.
But when i restart computer, Then nancy started but url related to nancy not work.
It give error
“GET https://localhost:4444/t1 net::ERR_CONNECTION_RESET”.
I try to find the solution. But got no solution.
Every time i have to run
netsh http add sslcert ipport=0.0.0.0:4443 certhash=YOUR_THUMBPRINT_WITHOUT_SPACES appid={06aabebd-3a91-4b80-8a15-adfd3c8a0b14}
After that it work. But after restart again i have to use same command.
Is there any solution for this.
The following command failed for me:
netsh http add sslcert ipport=0.0.0.0:4443 certhash=YOUR_THUMBPRINT_WITHOUT_SPACES appid={06aabebd-3a91-4b80-8a15-adfd3c8a0b14}
With error:
SSL Certificate add failed, Error 1312
A specified logon session does not exist. It may already have been terminated.
I had to import the certificate using MMC.exe’s certificate for local computer module instead of using certmgr.msc. You can watch the certificate listed using ‘certutil -store My’
Thanks for this post. Really helpful!
This will work if you register your URL as below :
netsh http add urlacl url=https://YOURIPADDRESS:4443/ user=YOUR_USERNAME
instead of
netsh http add urlacl url=https://+:4443/ user=YOUR_USERNAME
Microsoft publish a list of public IP addresses for the compute services hosted in their Azure Datacenters. When they say ‘compute’ they also include SQL Database, and the storage accounts seem to be included too.
I thought it would be interesting to write a script to count the total number of IP addresses available for each DC.
Here’s a pretty graph.
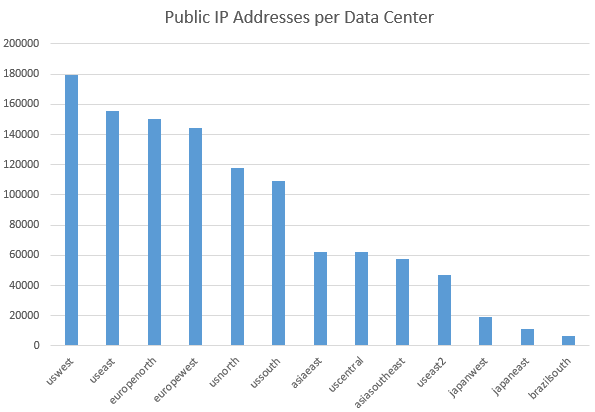
Whilst the number of public IPs is no way of working out the number of machines provisioned in each DC, it does at least give you an idea of the magnitude of each of the regions.
Some interesting things to note:
Here’s my processed data in table:
| DC | Total public IP addresses |
|---|---|
| uswest | 179504 |
| useast | 155808 |
| europenorth | 150400 |
| europewest | 144320 |
| usnorth | 118112 |
| ussouth | 109120 |
| asiaeast | 62384 |
| uscentral | 62336 |
| asiasoutheast | 57440 |
| useast2 | 46832 |
| japanwest | 18912 |
| japaneast | 10976 |
| brazilsouth | 6288 |
| TOTAL | 1122432 |
I think it will be really interesting to keep an eye on the IP ranges, and see how they change over time (or is it just me?).
I also published a tool to look up if an IP (or domain name) is hosted in Azure, it also tells you which DC it’s in.
The startup times for Orleans Silos seems a bit variable. I’ve tried a few things out, and got the startup time down when using the Dev/Test Silo. I don’t know if all of these make a difference, but they might be worth trying if you’re as impatient as me.
TraceToConsole="false" and TraceToFile="false" in the Tracing element.Orleans.OrleansClient.Initialize("DevTestClientConfiguration.xml"); line from Main.cs.SDK\LocalSilo\Applications directory.Orleans.FSharp.dll from SDK\LocalSilo.I’ve got startup time down to under 6 seconds.
My DevTestServerConfiguration.xml file looks like this:
<?xml version="1.0" encoding="utf-8"?>
<OrleansConfiguration xmlns="urn:orleans">
  <Globals>
    <StorageProviders>
      <Provider Type="Orleans.Storage.MemoryStorage" Name="AzureStore" />
    </StorageProviders>
    <SeedNode Address="localhost" Port="11111" />
  </Globals>
  <Defaults>
    <Networking Address="localhost" Port="11111" />
    <ProxyingGateway Address="localhost" Port="30000" />
    <Tracing DefaultTraceLevel="Error" TraceToConsole="false" TraceToFile="false"/>
    <Statistics WriteLogStatisticsToTable="false"/>
  </Defaults>
  <Override Node="Primary">
    <Networking Address="localhost" Port="11111" />
    <ProxyingGateway Address="localhost" Port="30000" />
  </Override>
</OrleansConfiguration>
My DevTestClientConfiguration.xml file looks like this:
<?xml version="1.0" encoding="utf-8" ?>
<ClientConfiguration xmlns="urn:orleans">
  <GatewayProvider ProviderType="Config"/>
  <Gateway Address="localhost" Port="30000"/>
  <Tracing DefaultTraceLevel="Info" TraceToConsole="false" TraceToFile="false"/>
  <Statistics WriteLogStatisticsToTable="false"/>
</ClientConfiguration>
Orleans has a cool feature for pub-sub messaging. This allows you to register for grain originated events without you having to poll a grain. Instead you can asked to be called back when the interesting thing happens.
To do this you create an ‘observer’ object. You then create a reference to this object, and pass it to the grain. The grain maintains a list of all observers. The grain can then send them all a message with a single call.
To create an observer, create an interface which inherits from IGrainObserver. You should put this in your Grain Interfaces project.
public interface IFooGrainObserver : IGrainObserver
{
    void Foo(string message);
}
Note that the method signature for
Fooreturnsvoid. This is a requirement for subscribers.
Next create an implementation of this class. It doesn’t really matter which project you put this in. It’s probably best placed in the project where you want the code to actually run, so if you’re sending a message back to the client, put it alongside your clide code.
class FooObserver : IFooGrainObserver
{
    public void Foo(string message)
    {
        Console.WriteLine(message);
    }
}
We’ll need a grain which is going to receive the subscriptions, and perform the publication.
This is the grain interface which has a method for registering a subscriber (Subscribe), and another to call when you wish to publish a message (Publish):
public interface IPubSubGrain : IGrain
{
    Task Subscribe(IFooGrainObserver observer);
    Task Publish(string message);
}
And this is the implementation:
public class PubSubGrain : GrainBase, IPubSubGrain
{

    ObserverSubscriptionManager<IFooGrainObserver> subscribers = new ObserverSubscriptionManager<IFooGrainObserver>();

    public Task Subscribe(IFooGrainObserver observer)
    {
        subscribers.Subscribe(observer);
        return TaskDone.Done;
    }

    public Task Publish(string message)
    {
        subscribers.Notify(x => x.Foo(message));
        return TaskDone.Done;
    }
}
Note that Orleans provides a
ObserverGrainManagerwhich helps you manage the subscriptions, and send notifications.
Now to actually make this work.
When the Grain Interfaces project compiles a factory is created for our subscriber (FooGrainObserverFactory) – just like the factories are created for the grains.
To use the factory, we pass in an instance of our IFooGrainObserver interface (which will be a FooObserver). This will give us back an object we can then pass to the Subscribe method of our grain.
This is the subscribe process complete. Now, just call publish.
Your client code (perhaps this is in your Dev/Test Silo) will look something like this:
var grain = PubSubGrainFactory.GetGrain(0);

// register a subscriber.
var observerRef = await FooGrainObserverFactory.CreateObjectReference(new FooObserver());
await grain.Subscribe(observerRef);

// send a publish
await grain.Publish("Hello World");

// Hello World is printed on the console by the instance of FooObserver
Simple!

Reply
You must be logged in to post a comment.